Wednesday, December 15, 2010

The electrician came..... and brought me an outlet.

So, not much progress has been made on the kitchen lately.  Scott has been working a lot, and I just haven't been motivated for rennovation projects.  The holidays have definitely taken priority.

However.... Scott knew that this weekend was my big holiday baking weekend.  So he thought it would be nice if he put the outlet on the island we had talked about, so that I could use my mixer and other electric appliances on the island.  Since the island originally had a large cooktop on it, there was no surface left for prep, therefore no need for an outlet on the island.

And since the "electrician" (Scott) had to put the outlet/light switch in along with the outlet also came our pendant lights. So I got two fun things today, light and electricity.


The outlet


The pendant lights


 So in my time of not doing projects around the house, I have done a few holiday craft projects.  Our backyard was full of pine cones, so I wanted to put them to use.  The kids and I made a few pine cone trees, and I incorporated some of them into a wreath I made for above the fireplace.  I just used a Styrofoam cone from hobby lobby, some hot glue, and a few simple decorations from the craft store.


Alex's Tree


Evan's Tree


Wreath


I also made a few ornaments which I have been making the last few years for friends and family.  Just a few supplies and you have a personalized ornament.
Ornaments


Just some photos of our holiday decorations from our first Christmas in our new house.


Hopefully we will have the kitchen done soon. Scott is planning to take a week off at the end of this month, so other than refinishing the wood floors it should be done by February... and  I bought the paint today, so that is one step closer.

Happy Holidays!

Tuesday, October 26, 2010

Midway before and after

Progress is moving slowly as life has taken over.  But I wanted to share the small pieces of progress we are making. The tile is finished, grouted and sealed.  I also decided to take a stab at staining the cabinets.  The top cabinets are finished, and we are pretty pleased with them.  We just went darker with a gel stain, and it turned out pretty nice.  We also replaced the handles with a simple black handle.


Here is kind of a full kitchen view of the progress we have made so far.


Scott had a nice moment the other day, he found his original "to-do" list for the kitchen renovation, and he had 90% of the items finished.  There is still a lot to do, but at least now it is mostly just little, non messy things.

Things left to do:
  • Add trim to top of cabinets
  • Finish staining cabinets
  • replace all cabinet hardware
  • put the chimney on the hood
  • replace the drawers below the gas stove
  • remove wall paper and paint
  • purchase and install pendant lights above the island
  • paint ceiling
  • replace the ugly white coffee pot :)

It might be a while until the final before and after shots are taken, but here is a preview of the transformation made so far.  It is hard to tell from the photos, but we have an extra foot of ceiling height, since Scott removed the drop ceiling and ugly fluorescent light.


Quite a nice change, if you ask me.

Stay tuned, hopefully we will have a final picture sooner than later.

Wednesday, October 13, 2010

The hood is up

A preview of the almost, well at least much closer to finished kitchen.  The hood is finally in place, finally giving us an idea of the final layout.  I never knew appliances could make a person so happy :)


Sunday, October 10, 2010

Adding Tile

After a break from rennovating, Scott found some time to jump back in and get started on some tile work with help from his dad. They hung the cabinets back up and got some of the tile up. 

Below are pictures of the finished drywall.  Scott was once again, bound and determined to to do it himself, and it turned out great.


We are getting closer, and it is starting to come together.  The tile work has been started, and we hope to have it finished soon. 
Here is a preview, hard to tell since it hasn't been grouted, but gives you an idea of the colors.


The top cabinets are back up, looking more and more like the finished product. 


And I finally got to contribute.  I painted the island black this weekend. I am pretty happy with it. We aren't sure what we are going to do with the other cabinets.  If anyone has ideas, please share.  We are not replacing them, but would like to darken them.


Hopefully I will be posting pictures soon, of finished tile work and an installed chimney hood. 

Stay tuned....

Thursday, September 16, 2010

Making Progress

Scott took some time off work and we, correction, he is making progress.  With the help of his father and our friend Tony, we now have all of the drywall back up in the kitchen.  Along with some new lighting!


I also had the opportunity to use my new GAS stove.  I didn't make anything special, but it was still nice to say goodblye to 1983 whirlpool electric and hello to 2010 Bosch gas :)  


I also decided to take a couple of days off, and have tackled the trim work in my entry way.  I also hope to have Evan's room finished this weekend, and will post those pictures soon.


More updates coming soon! 

Lessons learned:  I hate painting trim, but I already knew that.

One more shout out to Tony.  Thanks so much!

Wednesday, September 8, 2010

Kitchen Granite

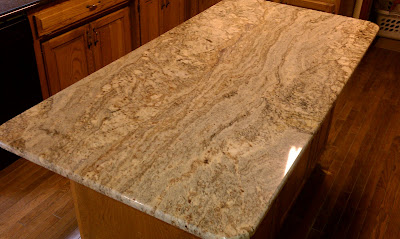
We got the granite installed.  I wanted to do something a little bit different, but I also don't want to spend a ton of money.  We basically decided on black pearl for our perimter counters, and venetian gold for the center island.  However when we went to preview our stone, I did not like the venetian gold.

So the rep took us to the remnant section, and we found an amazing stone for the center island.  Typhoon bordeaux.  Basically, all remnant stones are sold at the cheapest price, so we ended up getting the island stone for about half the price it would have been if it wasn't a remant.

And it is amazing, or at least I think so.


Lessons learned:  Shop the remnants!

Kitchen

The Kitchen is the big project.  We began this process a couple of weeks ago, or actually, Scott began. 

Here are our goals for the kitchen renovation
  • Remove drop ceiling
  • Install new backspash
  • Move cooktop to wall counter, and convert to gas
  • Install granite
  • Install a chimney hood
  • Paint
  • And the list goes on......
So far most of the prep work has been done.  Thanks to Scott!
Here are the before pics.


Not so great, but a lot to work with.

Demolition photos


Lessons learned: Let Scott tackle things on his own, he usually figures it out.

Dining Room

The Dining Room.  Finally I have before pics!


Lots, and lots of wallpaper. So I started with buying a fabric steamer for about $30 at Target.  That combined with a wallpaper scorer and a scraper, got it down.  It was a slow process, but needless to say, it came down and the walls were in great shape.  The kids even helped with the clean-up!


Once the wallpaper was down, Scott added some nice trimwork to the bottom half for a faux wainscoating look. Then the painting began.  It was a three week process off an on before it was finally finished.  Lots of paint to cover up the trim. 

I also decided to add a stencil to one wall.  I knew what I wanted the end result to look like, but didn't really know how to do it.  I basically just wanted a very slight sheen of a stencil.  So I asked the girl at Home Depot advice.  And she basically took the paint color I had and tinted it 15% darker.  I had no idea they could do that!  The end result was exactly what I wanted.

It is hard to see in photos but, here is the stencil. Very subtle.

I also decided to take a stab at making my own floral centerpeice.  If you look close, you can also see the carpet we put in.  It is textured, kinda fun.


Finally, the finished product.  Still have some accessorizing to do, but all in all it is complete.


Changes made:

  • Removed wallpaper

  • Add wainscoating

  • Paint

  • Paint stencil

  • Change chandelier

  • New carpet

  • New centerpeice
Lesson's learned: You can tint paint!, You can use a cheap fabric steamer to remove wallpaper successfully.

Half Bathroom

The half bathroom was my second conquest. It was pretty easy, just paint.  Again, I wasn't good at the before picture.  But here is a quick run down of what I did.  Painted the vanity from oak to black, painted the walls and trim, and replaced the hardware, countertop and faucet.

Here is a mid-progress picture.
With original countertop and faucet


Here is the bathroom with the new vanity and faucet. 


We still have to do the floors, I am thinking a black and white tile.  I also did a few craft projects for this one.  Who knew you could decopage a trashcan?


Ignore the floor, I promise I am replacing it soon. 

Lessons learned: You CAN decopage a trashcan, all for less than $5

Alexandra's Room

Alex's room was the first room I tackled and it was pretty easy considering, we used her same theme from the old house. There was only border in her room, so the wallpaper removal was pretty tame.This was my first try at covering up the wood trim.  Coat of primer, two-three coats of paint.  A lot of work, but the end result was well worth it.  The windows are a nightmare, and I have actually given up on window panes in some of the other rooms.  I was not very good about taking before pics, but here is the after.  Overall, pretty pleased.  It is amazing how quickly paint can change a room.   We went from a dingy painters grade off white, to a pale purple.